

If you've read our previous articles, you may have noticed us repeatedly mentioning the importance of having evidence to prove your M&E installations.

We've also emphasized that the need for evidence doesn't necessarily come from failure or 'doing things wrong'; but rather to be able to prove, with tangible evidence, that you've done everything you can to prevent failure and to be as safe as possible.
Perhaps you're working on a project, and the principal/Tier 1 contractor stipulates that the supports need to be evidence-based. In the face of this challenge, you'll clearly need to have evidence to back them up.
However, we understand that this can be slightly confusing – what actually constitutes evidence? What do you have to do to get that evidence? You might not know where to start and that’s completely reasonable. The term ‘evidence’ can seem a bit broad; but in the context of bracketry, here’s what you need to know.
To simplify it for you, we’ve broken it down into steps so that you can get started on your journey towards an evidence-based approach to your installations and compliance.

For demonstration purposes, we’ll be referring back to trapeze brackets and explaining how you would approach the M&E contractor’s challenge to find/provide the relevant evidence for the trapeze brackets you’d install.
- 1. Engage as early as possible
- 2. Ensure you are using a tested channel system
- 3. Ensure your installers are trained
- 4. Identify all of the connection points, channel beams, and any drop rods
- 5. Record the load capacity of each connection point, channel beam, and drop rod
- 6. Identify the lowest load capacity value
- 7. Record services' load value/weight and ensure it doesn't exceed the lowest load capacity value
- 8. Document, document, document!
- Conclusion
Step 1: Engage as early as possible
Within M&E, as a general principle you can say that the earlier you engage in the project life cycle, the better, easier, and smoother it will run.
If the project allows, try to get involved as early as in the design stage as this can save you time, money and effort in the long run. The earlier you engage with the supply chain i.e. suppliers that provide you with goods, services, and materials for your M&E supports, the more likely you will be to arrive at the best possible solution and meet your client’s expectations.
This is not just a step, but a principle to apply in your general work.
Step 2: Ensure you are using a tested channel system
Assuming the early engagement has already occurred, in order to then obtain the evidence, the best way is to use a tested channel system. This is thanks to all of the components being tested together (not just individually) by an independent UKAS-registered test facility which provides evidence (test data) that all of the components perform as a system.
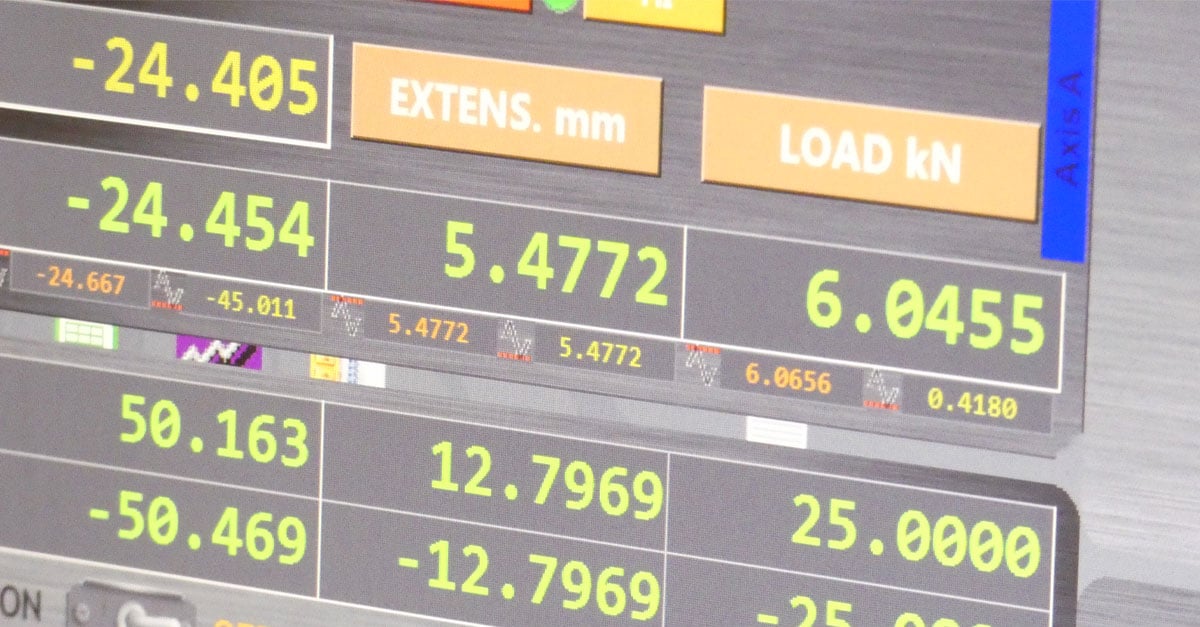
If you’re using a tested channel system for a trapeze bracket, the common connections would be tested, in this case, the threaded rod would be tested with the channel, plus the anchors and all other connections. Isn’t that just so convenient?! You don’t have to worry about a thing!
Step 3: Ensure your installers are trained
Installers must be trained and competent to install the tested channel system in line with the manufacturer’s installation guidelines. Reports, recommendations and guidance documents for good practice, such as the 2018 Hackitt report and the BESA TR50, commonly share this notion.
“Investing in improved competence levels could ensure that more skilled workers are able to correct errors and improve efficiency alongside ensuring compliance with the regulations."
- Dame Judith Hackitt, 2018
"Building a Safer Future: Independent Review of Building Regulations and Fire Safety"
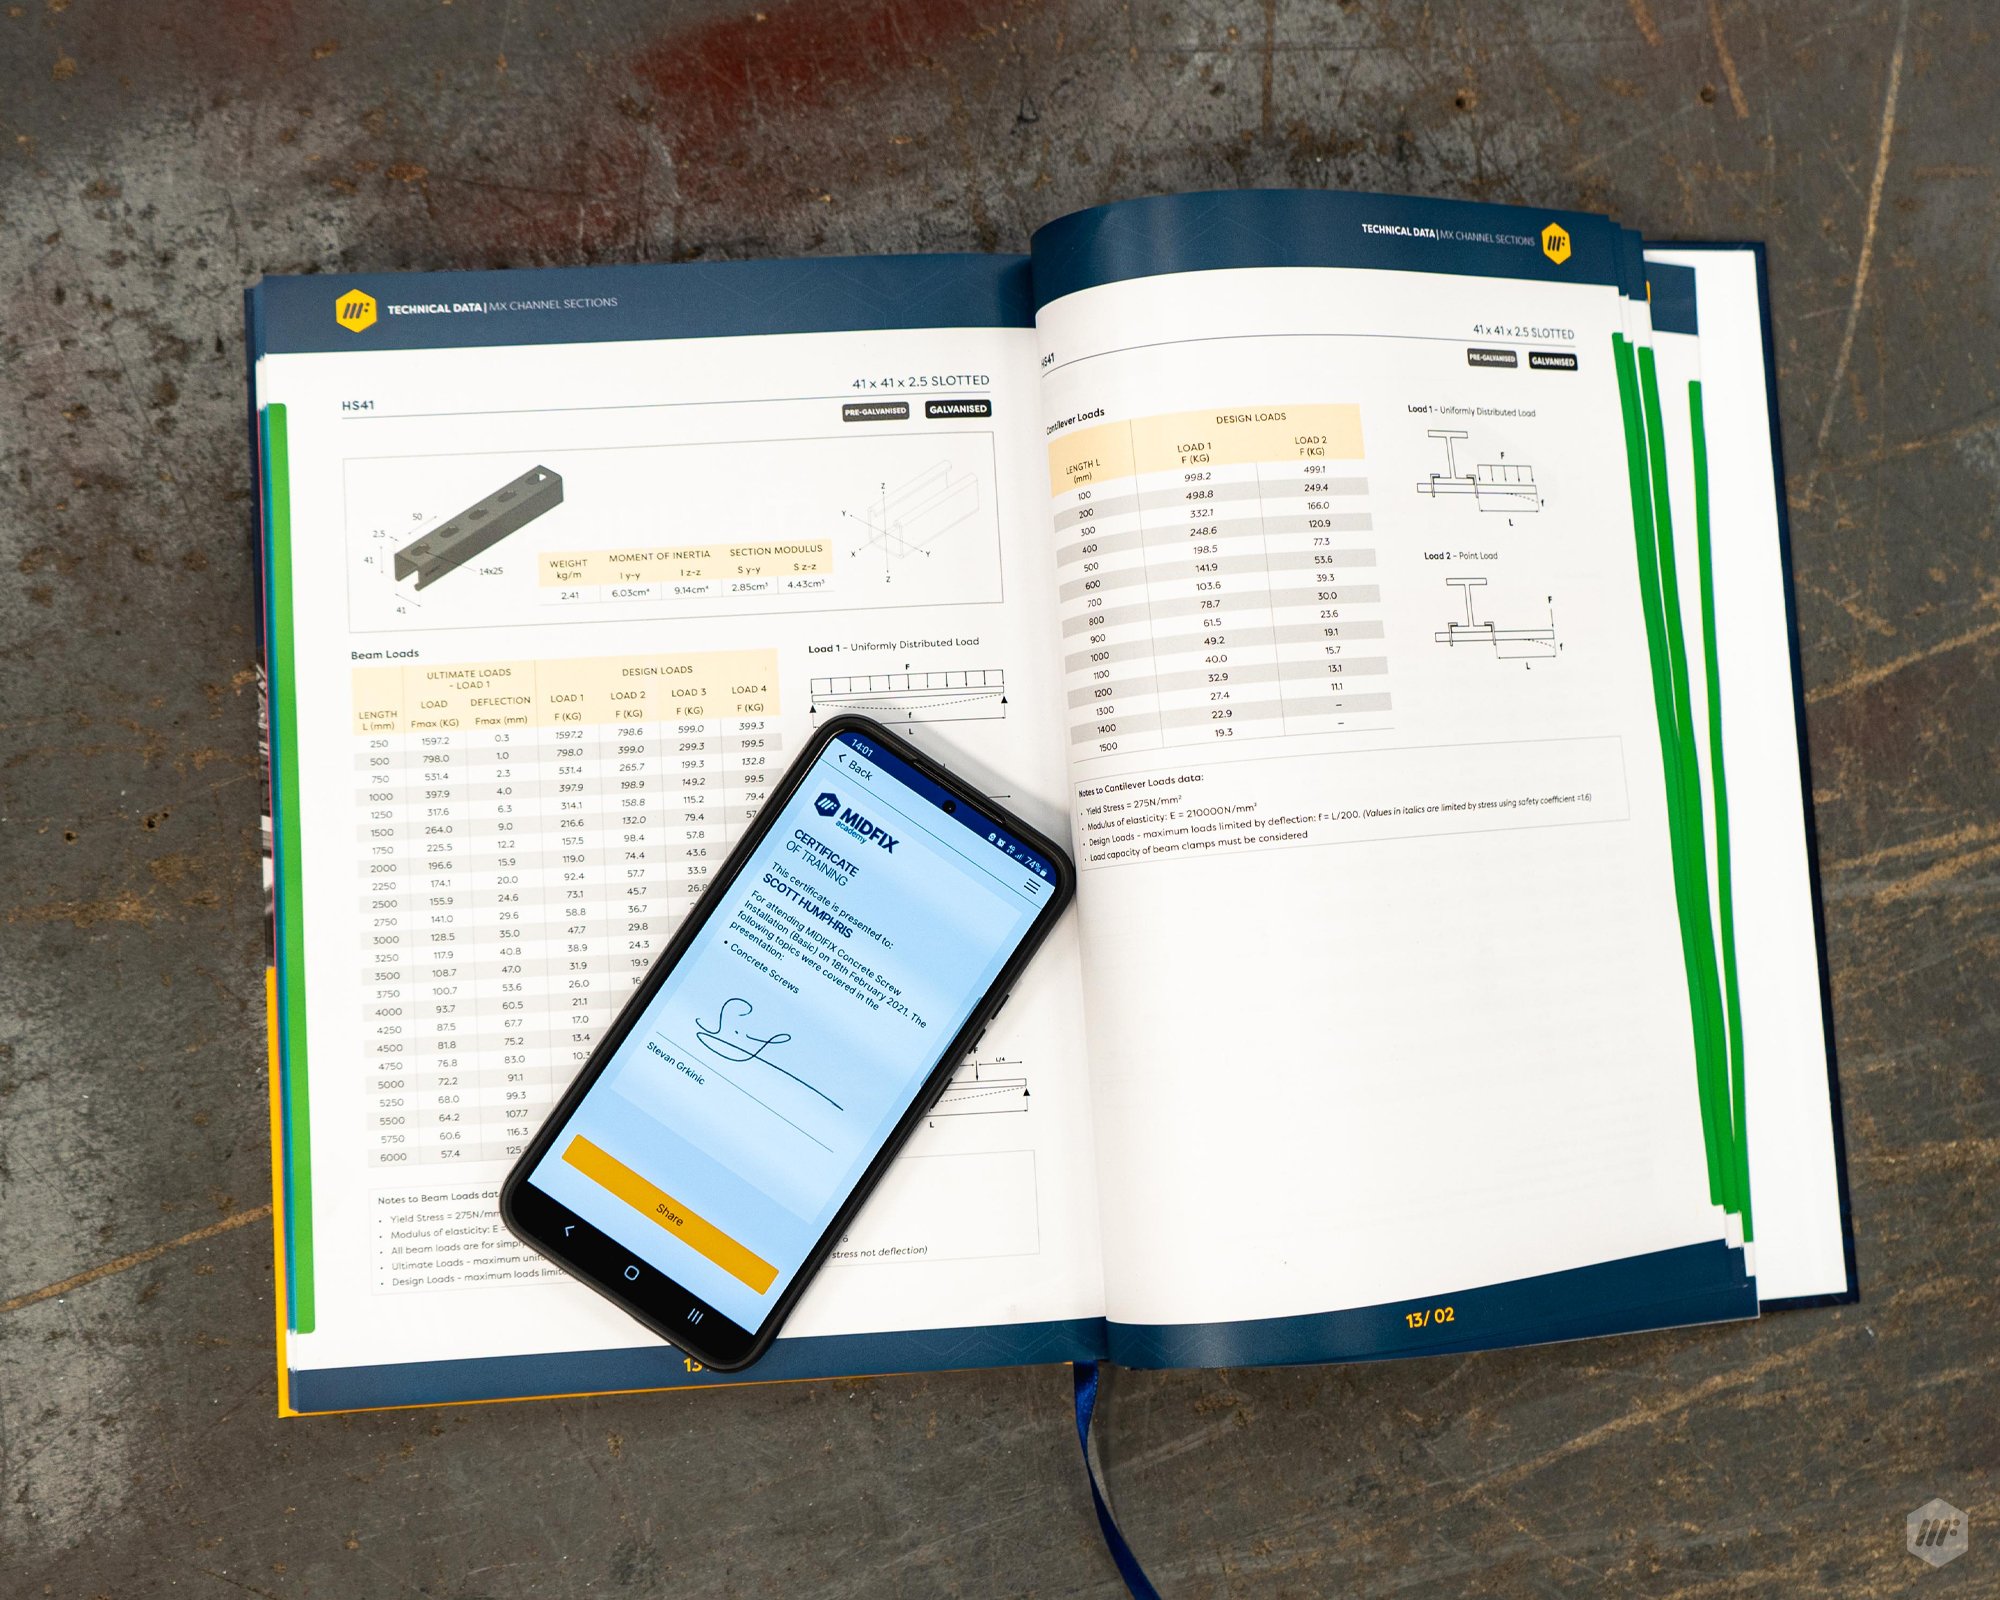
Ultimately, the certification that you’ll get off the back of training is what will count as evidence of your competence.
Installers often find when undergoing training that they end up changing their usual working practices because they find out that they’ve been doing it wrong! For example, back to the handy trapeze bracket emo, having to torque trapeze connections to the specified torque values (from the manufacturer’s guidelines).
The installer needs to be aware of not only the usual connection types for the system, but also the torque values for those connections. This is why installer training is so important – it’s one thing to design the bracket based on evidence, but it’s another thing to show that it’s been installed competently, too. Plus, you’d be surprised how much you can learn.
Step 4: Identify all of the connection points, channel beams, and any drop rods.
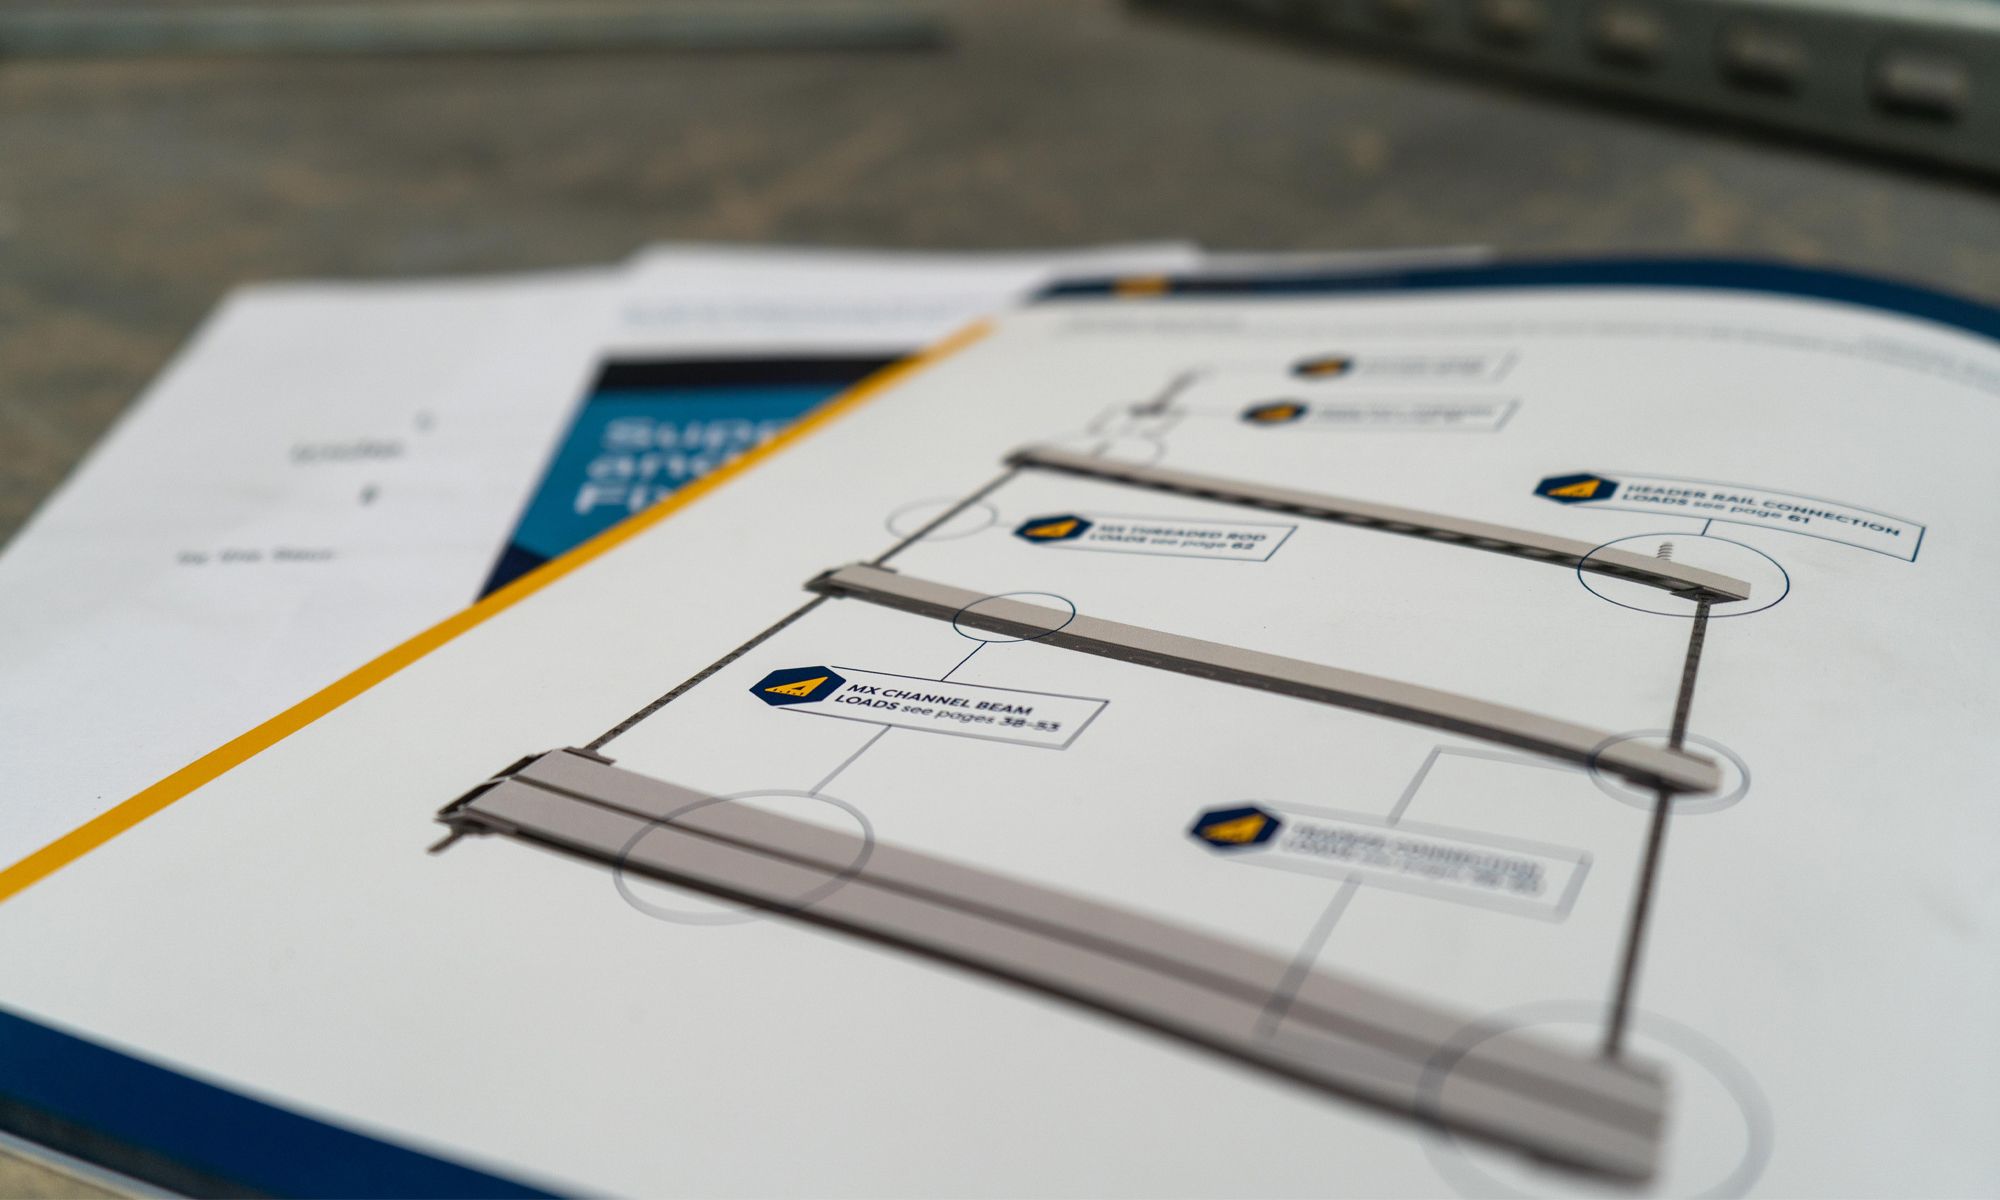
The first step to gathering the evidence is to identify all of the connection points on the bracket. When it comes to trapeze brackets, there are 3 aspects to be aware of: drop rods and channel beams, which are just the bracket’s components in isolation, and they will come with their respective load data. But that data alone isn’t enough; you’ll also need the load data for the connection points (i.e. channel to drop rod, and/or channel to substrate) because you have to ensure they work well together. This leads to the next step.
Step 5: Record the load capacity of each connection point, channel beam, and drop rod
Once you’ve identified all of those points, you should document them somewhere. Usually, the go-to, most efficient way to do this is by drawing (even if just a rough sketch) what you anticipate the bracket to look like. This way, it’s much easier to single out the sections (i.e. these are the 2 channel beams, the 2 drop rods, the 5 connection points, etc.) and calculate the capabilities of each of those and the bracket altogether.
From the tested channel system data, you can record the load data of each of those points – either on the drawing i.e. write the load values against each connection point, threaded rod, channel beam, substrate connection, etc. You should have them all recorded to prove that you’ve done your ‘working out’.
Step 6: Identify the lowest load capacity value
In most cases, the lowest load value will be where the anchor connects the bracket to the substrate, but this isn’t always true. Sometimes, you’ll have a cantilever supporting off of an I-beam; in which case, the connection type is completely different.
With trapeze brackets, it most likely will be the lowest load value, but you must still demonstrate that you’ve done the due diligence to make sure – because just ‘knowing’ is not evidence. So, on the drawing/sketch/whatever you’re using to record all of this, you’ll need some kind of visual identification of where the lowest load value is.
Step 7: Record services’ load value/weight and ensure it doesn’t exceed the lowest load value
Self-evidently, the whole point of calculating load capacity values is to ensure the weight values on top don’t exceed them. So double-check the load/weight of the services being placed onto the bracket and ensure that they don’t exceed not only the complete bracket’s total load capability but also each individual component’s/connection’s.
To give you a better idea: a trapeze bracket has multiple levels, which is why only knowing the lowest load capacity value isn’t good enough. You need to know all of the other connection load values because you might be placing a load on a channel beam which exceeds the load capacity of that levels connection point.
Basically, you need to make sure that the load placed on each trapeze level doesn’t exceed said level’s connection load value, and likewise, the accumulation of all of the loads must not exceed the load value of the substrate anchor connection. The same principle applies to goal posts as they often have multiple levels as well.
Often, companies will have some kind of policy that all brackets they install must have redundancy of 25%, for example. That means that they’ve tested that it can hold 25% over and above the load value, just to be extra sure! This extra precautionary measure is also important because unfortunately, ‘piggybacking’ is common in M&E, where somebody else might add extra loads to a bracket. So, it’s not unusual for companies to have redundancy factored into their design.
Step 8: Document, document, document!
Ensure that the entire process of your design is fully documented. Of course, if you’ve followed all of the above steps, this should happen by default. Naturally, the whole point is to have evidence, so you’ll need some way of filing and storing it efficiently so that it can be traced back and if ever asked for it, you can easily access it and prove your installations.
If I may suggest an effective way of doing so, with every project, store your designs and all of the evidence behind them in a central location, along with the installer training certification. This way, you’ll have one primary location to go to if required.
Conclusion
If you stick to the above steps for the majority of standard brackets, then there really isn’t much room for error because you’d have all the evidence and peace of mind that your brackets are fit-for-purpose.
Emphasis on the term ‘standard brackets’! What we mean by this is common and repetitive bracket designs, such as trapeze brackets, goal posts, plant supports frames, cantilevers, etc. When it comes to these, the steps are suitable and sufficient.
However, where you might need something more complex, such as 2D or 3D modules, then the loading has become much more complex and it’s important to engage with a bracket design specialist that can do all of this work for you i.e. design engineer. Simple things can be done, but don’t try to boil the ocean yourself because you can find yourself getting confused quickly!
As soon as you step outside the realm of standard bracket types and introduce a lot more variables, then you’re encroaching on engineering principles which you might not have the skills for. At the end of the day, design engineers and bracket specialists are there for a reason and they’re the experts at their job. Whoever does the bracket design should be able to provide you with all the evidence and calculations behind it.
Aside from that, we hope that this article helped you understand what kind of evidence you need to have to back up your bracket designs, and how to obtain it. Good luck with your future projects!