

Trapeze brackets are often used in construction projects, most commonly for supporting pipe and cable for ‘building services’ such as electricity, different types of plumbing systems such as LTHW (low-temperature hot water) systems, CHW (chilled water) systems, and more. As an M&E contractor, you likely come across them and are tasked to deal with them often, so you should consider a few things before fabricating one for a project:

- Consideration #1: Services
- Consideration #2: Channel Options
- Consideration #3: Loads
- Consideration #4: Fixing the bracket to the ceiling
- Consideration #5: Fabrication/assembly type
- Consideration #6: Provability/fit for purpose
- Consideration #7: Dimensions
- Consideration #8: Environment
- Conclusion
Services
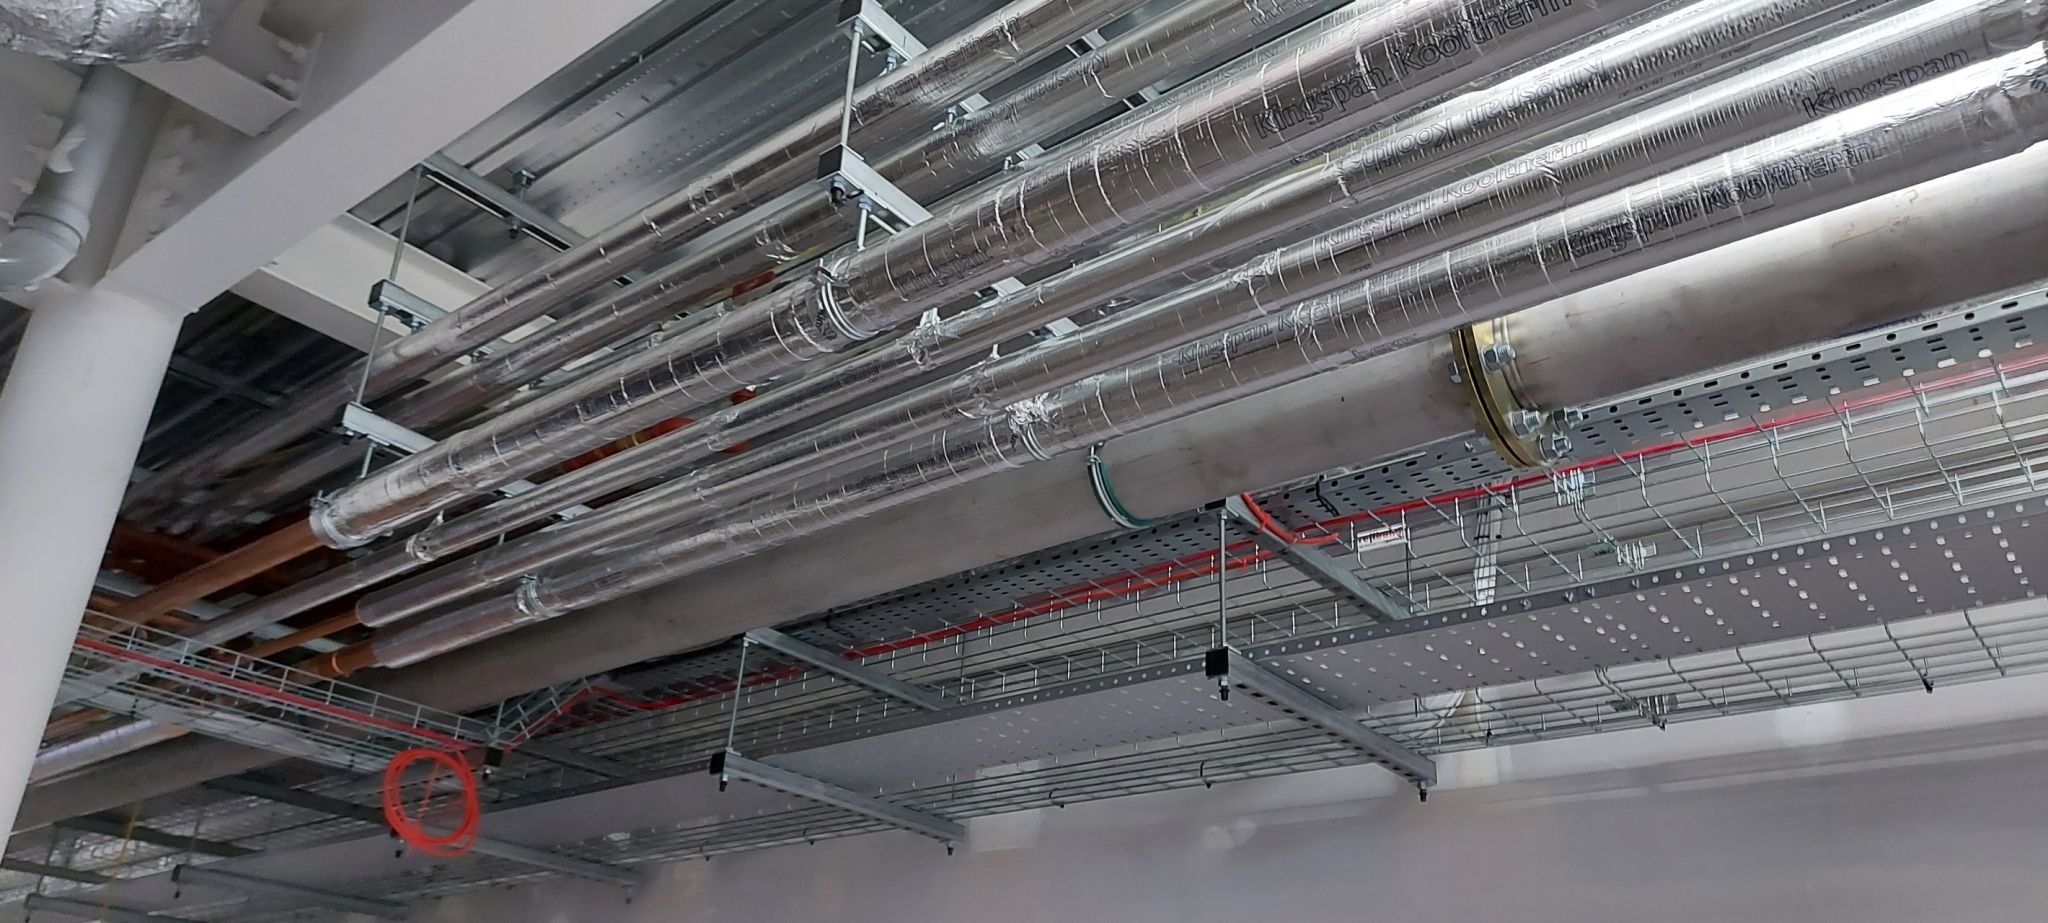
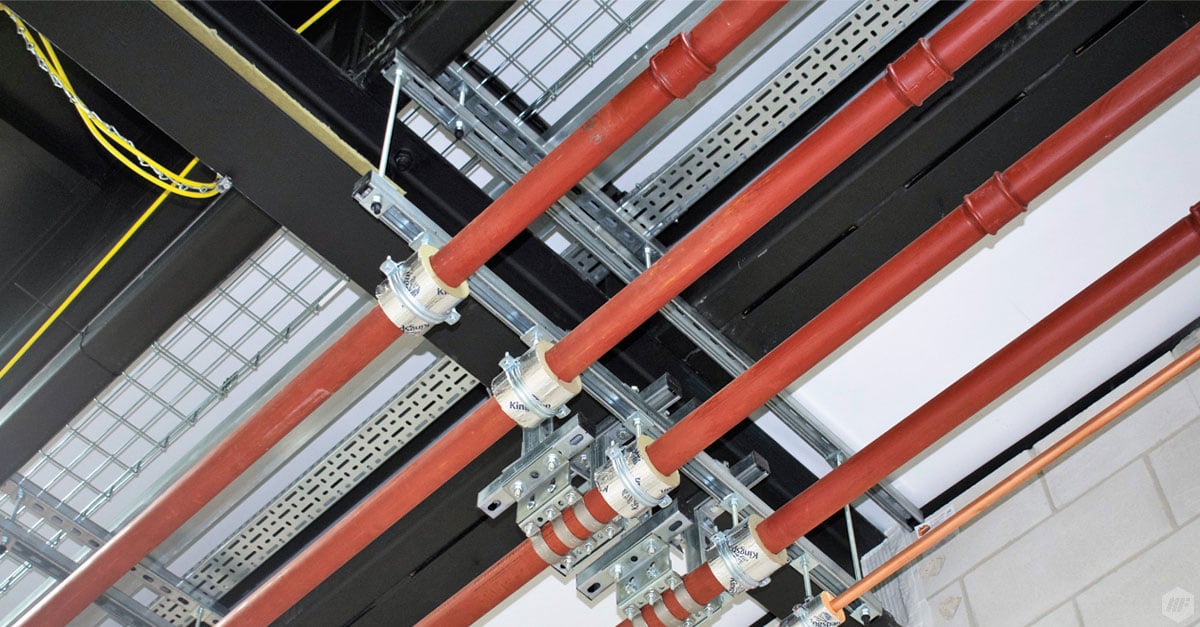
The core services that trapeze brackets will support are cable and pipes. The pipes are connected to the trapeze brackets using things like phenolic clamps/blocks or “pipe clips”, and for cable, you’d have to fix another product on it, such as basket, tray, or ladder, which is more heavy-duty and weighs more (so this could also affect the weight and/or width of the bracket), to hold it. What interfaces the cable to the bracket is called containment. This is the most efficient way for the cables to be supported together rather than individually. Think about what type of service the bracket will be used for – is it hot or chilled water? For both CHW and LTHW systems, insulation is used around the pipework. When supporting pipes on a trapeze bracket, you don’t want to interfere with the insulation. The insulation thickness of the phenolic block/clamp has to match that of the pipes; and depending on whether they’re meant for hot or cold water, the insulation thickness will differ – so this would, in turn, affect the phenolic clamp that you use for the trapeze bracket and the size of it, which would therefore also affect the bracket itself and its own size. It should also be noted that different services have different weights – so think about that when choosing the channel type, etc. Trapeze brackets are also used for HVAC units; and while these are usually lightweight, they are often cumbersome in size, which could greatly impact the size of the bracket you fabricate for it and possibly the channel type. Moreover, the weight of the services on the bracket will determine how the bracket will perform, then the weight of the services plus the weight of the bracket will determine what anchors you can use in the substrate (almost everything will influence what anchor you should use).

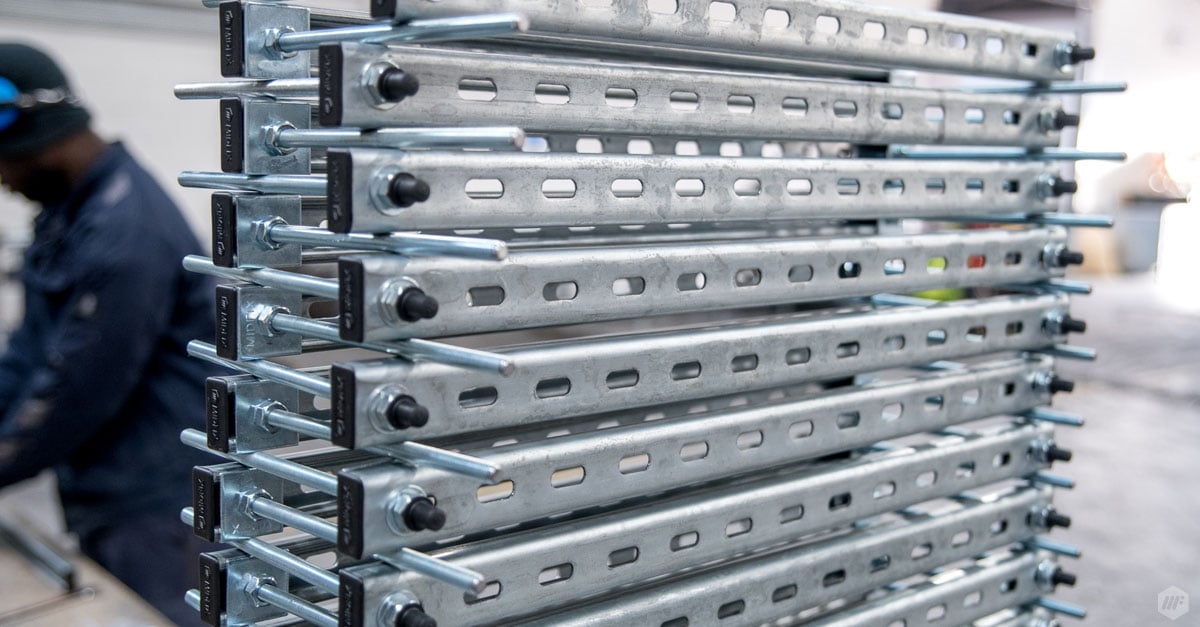
Channel options
Before fabricating your trapeze bracket, you should be aware of the several types of channel that you can use to determine which one is the most suitable. Just like with AHU support frames, the channel you choose depends mostly on the loads, as certain channel types are more suitable for heavier loads. For example, you have single channel which is better for lighter loads, while modular steelwork/Framo and back-to-back channel can carry heavier loads, as well as 41x41 channel which can carry heavier loads than 21x41 channel – which leads onto our next point: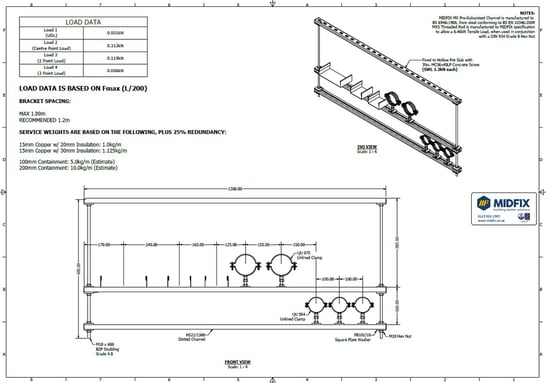
Loads
Shocker! Yes, you should think about the loads (point loads and distributed loads) that the trapeze bracket is expected to endure before fabricating it – but you probably already do (if not then, what have you thought about exactly?). Each tier of the bracket could be a different section of channel. As we’ve established, the weight depends largely on the services. Electrical, in most cases, is fairly light, so generally back-to-back channel is not needed. If for example, you’re supporting decent-sized pipework (which is holding water in most cases), accumulation of those would place a heavy load on the bracket from a deflection point of view, and you might want to step up to something more substantial like back-to-back or even Framo (modular box section) in some extreme cases - however, this is an exception, not the rule. If a load is too heavy, you should first consider changing the channel type. In some cases, you can also change the spacing between the trapeze brackets (i.e. bring them closer together to fit more brackets) to carry more weight. Also consider that the bigger the thread size, the thicker your drop rod, the more load it can take. The most common thread size in M&E is M10, but it is often used unnecessarily, even in instances when the weight of the load doesn't require the extra support of M10 rods - you might even only need an M6 rod. Loads will influence the channel types that you’ll use on different tiers, and then the accumulation of the loads, channel types, and bracket overall will impact the anchors you should choose. That then leads to the process of physically attaching the bracket.
Fixing the bracket to the ceiling
When fixing the bracket to the ceiling, you should consider a number of things: the substrate, the header rail, and the type of anchor you should use. These all overlap with each other so stay with us! When it comes to the substrate, the primary thing that it influences is the way in which the trapeze bracket is fixed to the ceiling and what anchors you use. If you assemble the bracket onsite, you will work out the sizing that you need, cut the drop rods and channel sections to correct lengths, then connect the drop rods to the ceiling. If the substrate is concrete, which it typically is, there are a handful of anchors that you can use for that: the most common one is called a deformation or ‘wedge’ anchor, or you could use a rod hanger to wind it straight up into the thread. This would get embedded into the concrete, by screwing the thread of the drop rod right into the substrate. If it is a concrete ceiling with a metal deck, you would need to use decking fixings for these. If the trapeze bracket is assembled offsite, it will come with a header rail and the drop rods attached to each other, meaning you can’t fix it into the ceiling that same way.
The header rail is a piece of channel attached to the top of the bracket; usually made of slotted channel. Whether you use 41x41 or 21x41 channel for the header rail, it doesn’t make much of a difference in terms of the load-bearing capacity. In cases like these, we then narrow down our options to use an LP (low-profile) concrete screw-type anchor, such as a dome-head, to fix it to the ceiling. In short, instead of attaching the drop rod to the ceiling, we attach the drop rod to a header rail and fix that to the ceiling. You should also consider with substrate the embedment depth.
Anchors come in varying lengths and they are the point of contact between the bracket and the concrete – so if there is reinforcing bar (or rebar) within it, you need to know how deep it is to work out the embedment depth and length of the anchor. This will in turn have an impact on the load that the anchor can handle, which therefore affects the dimensions and services that you can put on the bracket. It’s a lot, we know, but it’s important to keep considering these factors, from start to finish and from the bottom up, to make sure you will fabricate the most suitable trapeze bracket. In most cases, you only need to use header rail when the bracket is fabricated offsite. But when and why would you fabricate offsite? Well…
Fabrication/assembly type
Usually, when you’ve got a lot of them (trapeze brackets) to fabricate, doing so onsite can be very time-consuming. Bearing in mind the cutting and assembling all being done overhead, it is quite demanding work. Whereas, if you do it in a factory environment, you can put them together more efficiently because tools can be used offsite that can’t be used onsite which helps to achieve the end result much quicker. Economies of scale. Sure, it will cost you a bit more upfront; but with the unseen costs of labour onsite, the two would arguably come out to be cost-neutral in the end. Read more about the pros and cons of offsite and onsite construction.
For lightweight electrical instances, you can opt for proprietary systems that mimic the principles of a traditional trapeze bracket that use drop rods and channel, but allow for a much faster installation. These would also be anchored to the ceiling. This system is admittedly very innovative and speedy, however, it does have its limitations – because of its adjustability and flexibility, the load-bearing capacity is reduced and it’s quite easy to overload. The only appropriate application for these is when the load is light e.g. electricity. So whilst there are channel systems with specific configurations available that speed up the installation process, the information around these is limited, and it can be difficult to prove that they can perform well because thorough testing hasn’t been done – so keep that in mind.
Proving that it’s fit for purpose
This brings us to the question: are there requirements onsite to prove its performance, or are there aspirations within your company to be able to prove that your systems can perform? With offsite, you are much more likely to be able to prove that your trapeze bracket is fit for purpose because it would be designed using products that are known and can be proven to perform well. It’s not a case of ‘do a design, see if it can perform’ – in contrast, it’s ‘design it to match the performance that is required’. Additionally, it’s usually done through one organisation using one system. On the other hand, when manufacturing onsite, the components making up the bracket, such as 3-metre threaded rods and channel, will normally be sourced from different manufacturers - meaning they haven’t been tested together so there’s no way to substantiate that they work well together.
Assuming you’re an M&E contractor, your client is typically a Tier 1 contractor. Sometimes, when you’re awarded a project, the Tier 1 contractor might ask that “every bracket on this site must have a design that says it will perform to the loads it’s required to”. That’s not always the case, but it does happen. Regardless, some M&E contractors are becoming much more conscious of provability and want to apply the principle to everything they do throughout the company. At the very least, you should contemplate that it doesn’t hurt to go with a provable, preventative solution and be prepared from the start.
Dimensions
By now, you might’ve already concluded that almost all of the aforementioned considerations contribute to what dimensions will be specified for the bracket. These include the maximum amount of width you’ve got, the number of services, the types of services, the sizes of the services - all of which determine the dimensions you will need. Something else that could affect them is the width of the corridor; obviously, you can’t fabricate a trapeze bracket that’s wider than the area it will be built in – it won’t fit! The good news is, if you have to adjust or reduce its width to fit the corridor, you can account for it by fabricating more tiers.
Environment
Last but not least, think about the environment that the trapeze bracket is intended for. In about 95% of cases (that’s a guesstimate not a statistic!), they will be indoors, so you can get away with using pre-galvanised product. However, if it’s meant for a highly corrosive environment such as a swimming pool (chlorine is very corrosive when it comes to metal), you would need to use something like stainless steel. In cases where it’s outdoors, although rare, then you would need to consider something with a galvanised finish for corrosion protection. The following ISO 9223 table below highlights the different classes of corrosion and its impact within different environments.
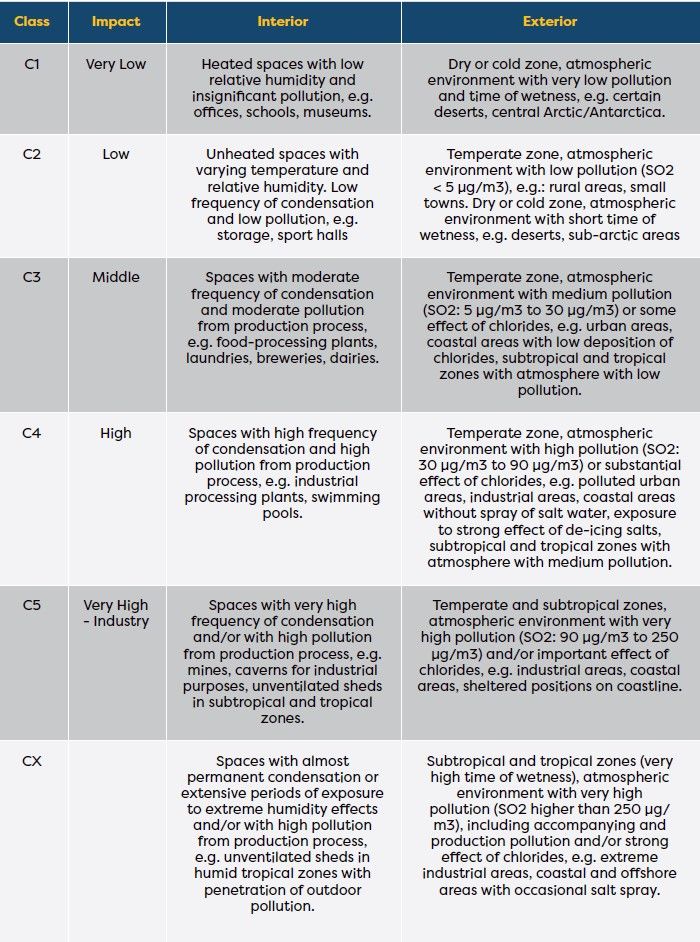
ISO 9223 corrosiveness of the environment
Conclusion
We hope that this article has helped you understand trapeze brackets at a more comprehensive level, and to recognise the different types of it, as well as the best applications for each. Remember to consider all of the above elements to ensure you’ve chosen and fabricated the highest quality brackets for all of your projects