

With the endless options available, along with different sizes, finishes, etc., it can get very confusing trying to navigate the realm of anchors and selecting the most suitable one for your projects.
The goal of our content is primarily to help you and to eliminate this confusion little by little. So, let’s start by comparing the three most used anchors in M&E: concrete, wedge, and throughbolts. But before then, let’s talk about what makes anchors so important in the first place.

Contents:
- Why are anchors/fixings important?
- Common drilling issues
- Concrete screws - what are they?
- How do concrete screws work?
- How do you install concrete screws?
- What are the different types of concrete screws?
- Deformation-controlled (wedge/drop-in) anchors - what are they?
- How do wedge anchors work?
- How do you install wedge anchors?
- What types of wedge anchors are available?
- Throughbolts - what are they?
- How do throughbolts work?
- How do you install throughbolts?
- What types of throughbolts are available?
- Conclusion
Why are anchors/fixings important?
Anchors are imperative because they are the interface between the services that we are holding up and the substrate – the ‘glue’ that holds the two together. They may be small but they are mighty!
But what’s intimidating is the fact that an anchor’s performance depends largely on the installer i.e. the way it was installed. If installed incorrectly, it’s very likely to fail, which is why it’s so important to be competently trained for compliant installations.
They’re also prone to deterioration over time and it usually isn’t visible because, after installation, they are masked (by concrete, other services, suspended ceilings, etc.).
Not only that, but anchors are vital for the success of a support system, because if one anchor fails, it causes a ripple effect and leads to the failure of the other anchors as they hold more weight, and finally the entire system.
As if that isn’t enough, anchors are usually installed overhead, classing them as ‘safety-critical’ applications i.e. they can cause risk to human life and/or significant economic loss. This makes them even more important to get right – why take the chance? Why take such a tremendous risk?
So, really, there’s no excuse to neglect compliant selection and installation of anchors in accordance with the BS8539 Code of practice– unless, of course, you want your structure to fail, or you don’t mind risking injury or worse still, death. It may sound harsh, I know, but it’s the truth!
Common drilling issues
I’d like to get some common questions commonly faced with drilling in almost any anchor installation out of the way.
The first of which is, where do you find the drilling information? …Well, just look at the box the anchors came in! Most ETA-approved anchors will have this info listed – if not, ask for the datasheet of the product. If you don’t know the drill diameter and depth information, STOP and ask! You can’t go through with the installation without these.
Another common obstacle is hitting rebar (reinforcement bar) when drilling. If you do, stop and seek advice. Never be tempted to reduce anchor embedment if this happens. Either obtain permission to drill through the bar from the responsible structural engineer or reposition the anchor (following repositioning guidelines).
Lastly, what drill bit should you use? It’s best to use one that has a PGM logo on the shaft as these are of the highest quality. Don’t use a worn-out drill bit as the hole will not be accurate.
Before I continue, it should go without saying that prior to carrying out any installation you must wear PPE.
Anyway, now it’s time to break down the different types of anchors.
Here’s a table that summarises some key points about the anchors:
|
Anchor |
Anchor type |
Most suitable substrates |
Common applications |
|
Concrete (rod hanger) |
Interlock |
Cracked and non-cracked concrete, solid brick |
Suspending M8/M10 threaded rod |
|
Concrete (LP screw) |
Interlock |
Cracked and non-cracked concrete, solid brick |
Holding slotted channel back onto substrate |
|
Concrete (hex-head) |
Interlock |
Concrete, solid brick |
Baseplates, high loads |
|
Wedge |
Friction |
Non-cracked concrete, sometimes cracked |
Static, medium-high loads |
|
Throughbolt |
Friction |
Concrete |
Heavy loads |
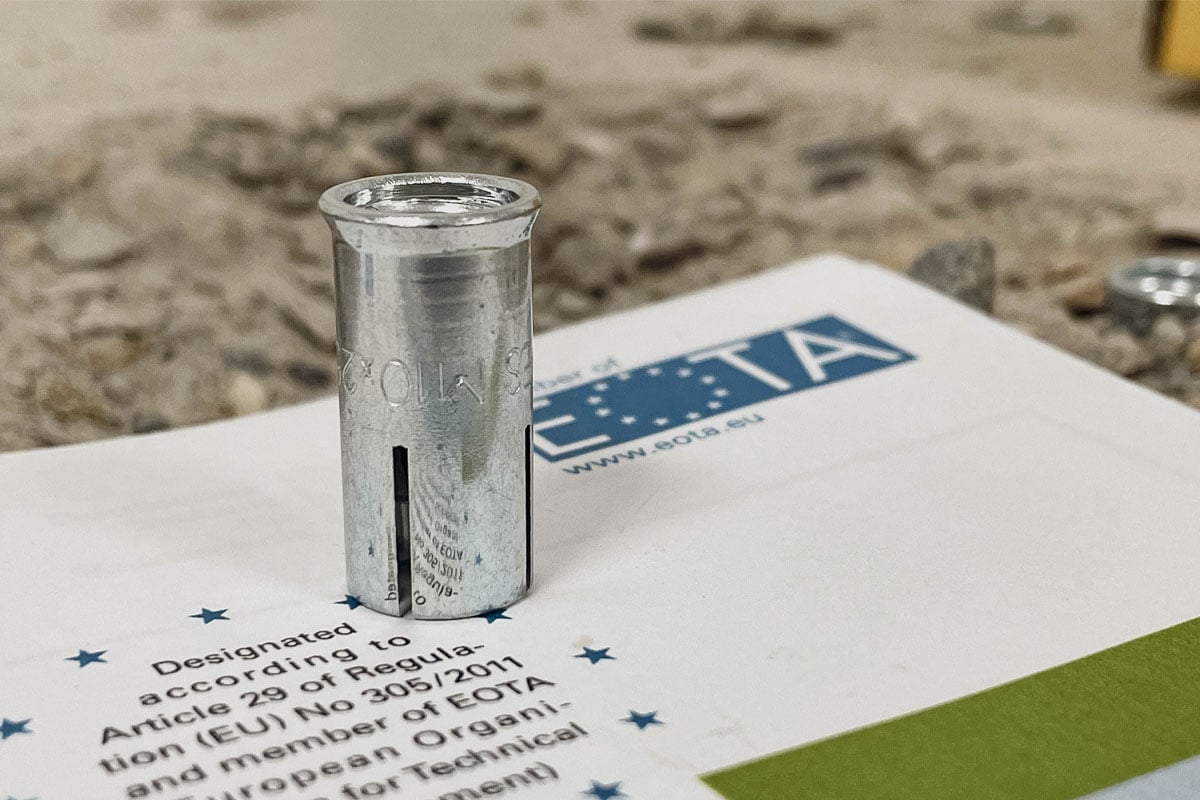
Concrete screws - what are they?
Concrete screws are classed as an ‘interlock’ anchor. They’re generally suitable for concrete and solid brick. However, they have been used successfully for high-density natural stone and solid concrete block, but before fixing into these substrates, testing is recommended. They come in a wide variety of lengths, diameters, and head designs.
In recent years, they’ve grown in popularity and continue to do so – and rightly so. Combined with the right substrate, they’re a great option because they’re quick to install and relatively low in stress. This means you can place them closer together and closer to wedges within the substrate without any difficulty.
How do concrete screws work?
They’re called ‘interlock’ anchors because they rely on the undercut principle. The installation torque will cut a thread along the entire length of the flute of the anchor. This is what creates the resistance for the anchor to work, making this type of anchor very effective.
-2.png?width=692&name=MicrosoftTeams-image%20(2)-2.png)
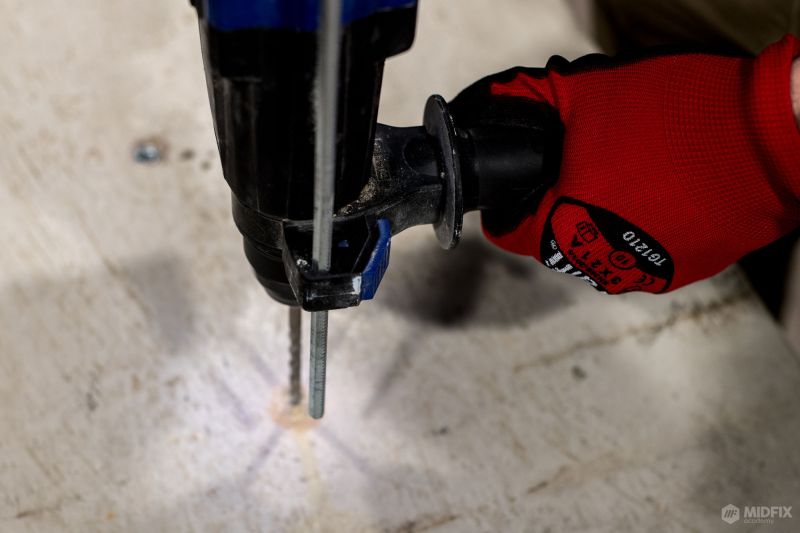
How do you install concrete screws?
You will need:
-
Drilling machine
-
Drill bit
-
Blow tool
-
Socket/Torx bit
-
Correctly rated impact wrench/hand ratchet
-
Hole diameter
-
Hole depth
-
Manufacturer's installation torque value

Step-by-step installation process:
- Drill hole to the correct diameter and depth.
- Clean hole thoroughly either with a blow tool/gun or a vacuum extraction drill bit. Make sure you have the necessary PPE as dust will be released into the air.
- Insert the anchor through the fixture or straight into the hole and drive home (screw), with the correctly rated impact gun - the tool should not exceed the Maximum torque (Timp) as outlined in the manufacturers guidelines - until the bolt head is firmly seated against the fixture or concrete surface (release your finger off the trigger at this point).
- In certain substrates (e.g. lower strength materials) and where a secondary component is attached to the concrete screw then it may be preferable to manually install the concrete screw to the installation torque (Tinst) stated within the manufacturers instructions - most likely applied with a calibrated torque wrench.
Remember if you do not use a tool without the correctly rated torque you run the risk of overtightening concrete screws possibly stripping the thread that we cut into the concrete or you may not drive the screw down until it has shouldered on the base plate.

What are the different types of concrete screws?
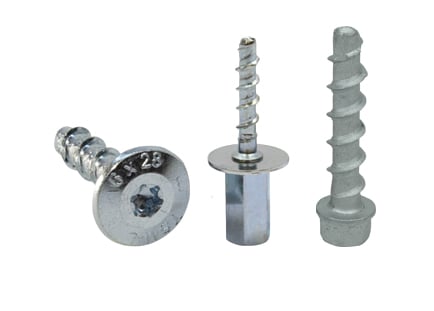
There are several types of concrete screws, but there are three that are most frequently used.
The first of which is called a ‘rod hanger’. These are typically used overhead to suspend either M8 or M10 threaded rod and hanging building services from solid and hollow concrete ceilings. The ETA-approved ones come in a couple of lengths; 35 and 55mm.
Another type is ‘large panhead’ or LP concrete screws. These are used to fix slotted channel onto cracked and uncracked concrete and come in two options to choose from, depending on the maximum material thickness to be fixed.
Finally, you’ve got ‘hex-head’ screws which have many different applications but are typically used in for baseplates where you would’ve traditionally used a throughbolt. They have a high load capacity in cracked and uncracked concrete and come in many different sizes and maximum thicknesses ranging from 5mm to 100mm.
OK, next up are…
Deformation-controlled anchors – what are they?
These have been called many names – wedge, drop-in, redheads, hammer set, bullets, bung, knock-in, flush anchors… and probably many more. (In fact, I made one of those up – kudos if you can guess which one😂).
Essentially, they are internally threaded ‘friction’ type anchors intended for use primarily in non-cracked concrete and sometimes cracked (not all wedge anchors are ETA-approved for use in cracked concrete but some are).
How do wedge anchors work?
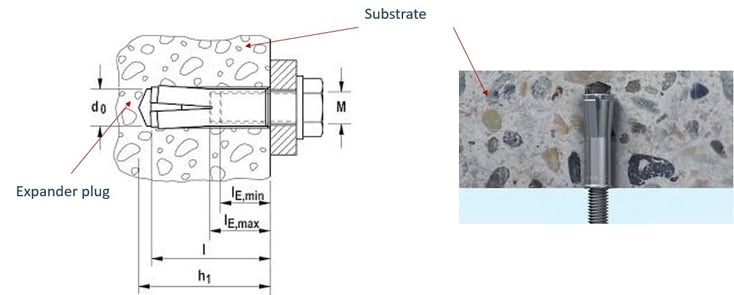
They rely on a wedge deforming the outer shell of the anchor to cause friction inside the substrate and it’s this friction that resists the load applied to the anchor.
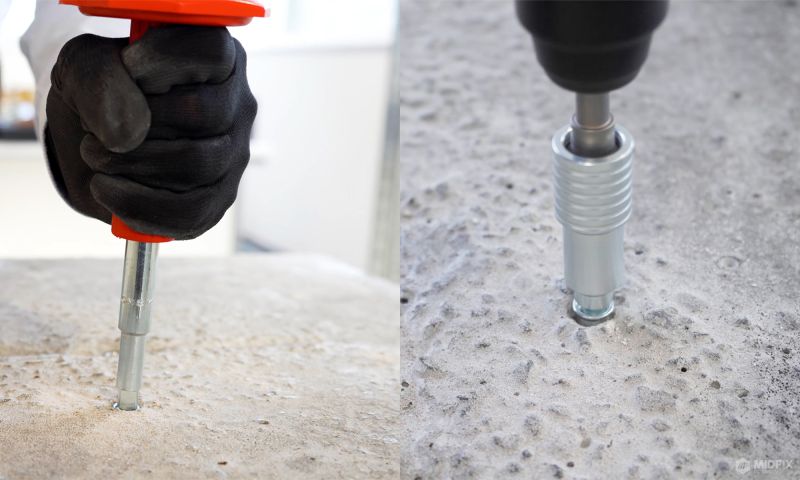
The top picture shows the cut-out with the expander plug before the setting tool has been inserted and struck home. The bottom shows that same expander plug after it’s been driven to the correct depth by the setting tool. As you can see, driving the setting tool down the bottom of the anchor expands the anchor at the base, producing the required friction. This imposes very high loads on the substrate.
They generally resist the load depending on the depth of the anchor with how much substrate they’ve actually mobilised.
-3.png?width=642&name=MicrosoftTeams-image%20(3)-3.png)
How do you install deformation-controlled/drop-in/wedge anchors?
You will need:
-
Drilling machine
-
Relevant drill bit
-
Hole cleaning pump or blow tool
-
Correct hammer
-
Either a manual or automatic setting tool
-
Torque wrench for the fixture
-
PPE
-
Hole diameter
-
Hole depth

Step-by-step installation process:
- Drill the hole to the correct diameter depth. Using a stop-drill will give you the correct depth for the given anchor. Ensure that, no matter what drill-bit you use, it has a PGM logo, as these are of the highest quality.
- Clean hole thoroughly (usually with a dust removal pump, but this can be done with a vacuum extraction drill-bit) (as specified by manufacturer/ETA).
- Insert anchor and tap it in until it sits flush with substrate.
- You can either set the anchor with a manual setting tool or with an SDS setting tool. It’s imperative that you only use the setting tool recommended by the anchor manufacturer for the size of the given anchor and not a makeshift one! If it’s possible to use a handguard and/or a hammer drilling machine setting tool, all the better.
- For automatic setting using the stop-drill, slip the setting tool house in over the stop drill. This goes into your SDS drill. Turned on to hammer only, you can automatically insert the wedge anchor.
- Manual setting; ensure you use the correct weighted hammer, and if your setting tool is equipped with a witness mark, make sure it is visible on the lip of the anchor.
- Apply fixture, insert bolt and tighten to manufacturer’s recommended torque.
If you’re using a set screw, make sure you tighten it to the manufacturer’s recommended torque value using a calibrated torque wrench.
Also, as it is a friction anchor, you need to be aware of edge distances and spacing between anchors because you can cause blow-outs and even total anchor/installation failure.
The setting tool is just as important as the anchor.
-
Only use the anchor manufacturer’s recommended setting tool for the given size of the anchor
-
If witness marks are catered for, ensure they are visible once the anchor is set
-
Where possible select a setting tool with a handguard
-
Where possible use a hammer drilling machine setting tool. If you can, use setting tools that rely on the SDS machine to apply the hammering action to set the anchor
-
Never use a ‘homemade’ setting tool or slave bolt
Ensure the hammer used is sufficient to deliver the energy required to set the anchor
What types of wedge anchors are available?
There are two main types of wedge anchors – the types with a rimmed (or lipped) design for flush setting and the types without. However, ETA-approved wedge anchors only come with the rim/lip (but there are non-ETA approved ones of both kinds). And as we’ve spoken about before, you should always use ETA-approved anchors when available.
ETA wedge anchors come in a variety of thread sizes and anchor lengths. For example, there is M6x12 wedge anchors, M8x12, M12x18, etc. If, for example, the substrate you’re dealing with contains rebar, you would take the embedment depth into account and choose a wedge anchor that’s shorter in length (25mm instead of 30mm or 50mm).
Finally, let’s talk about…
Throughbolts - what are they?
Throughbolts are also friction anchors. The difference is that the friction is applied using torque as opposed to deformation – but they rely on the same principle. Again, they impose high stress onto the substrate, which is one of the reasons why they’re only suitable for concrete either cracked or non-cracked.
How do throughbolts work?
A throughbolt is made up of several different components. The nut, the washer, the main shank including the expansion taper at the bottom, and a loose expansion clip (pictured below). On some throughbolts, you’ll find depth indicators on the threaded section.
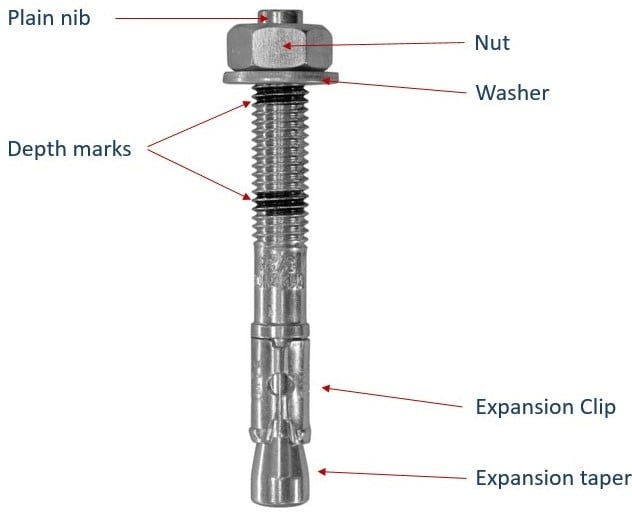
When you wind the nut down on top, this brings up the expansion taper into the expansion clip, at which point the friction required to resist the force against it is created.
How do you install throughbolts?
You will need:
-
Drilling machine
-
Drill bit
-
Blow tool
-
Hammer
-
Torque wrench
-
Socket
-
Hole diameter
-
Hole depth
-
Setting torque

Step-by-step installation process:
-
Drill hole to correct diameter and depth.
-
Clean the hole thoroughly by blowing and brushing or using a vacuum extraction drill bit.
-
Make sure the washer and the nut are just below the plain nib and insert the anchor to the correct depth. You’ll need a hammer for this process.
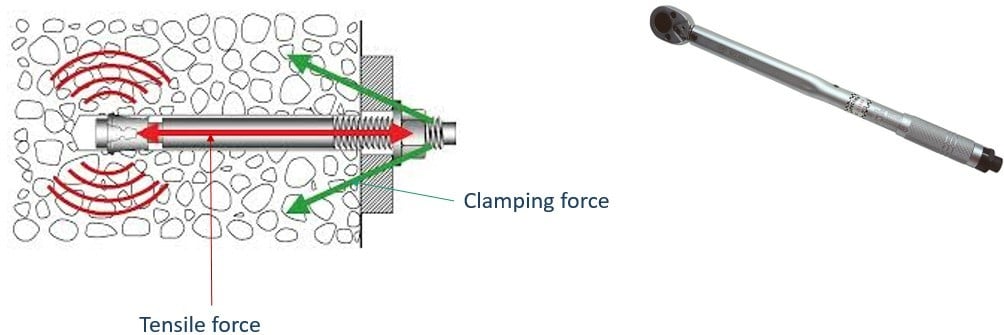
-
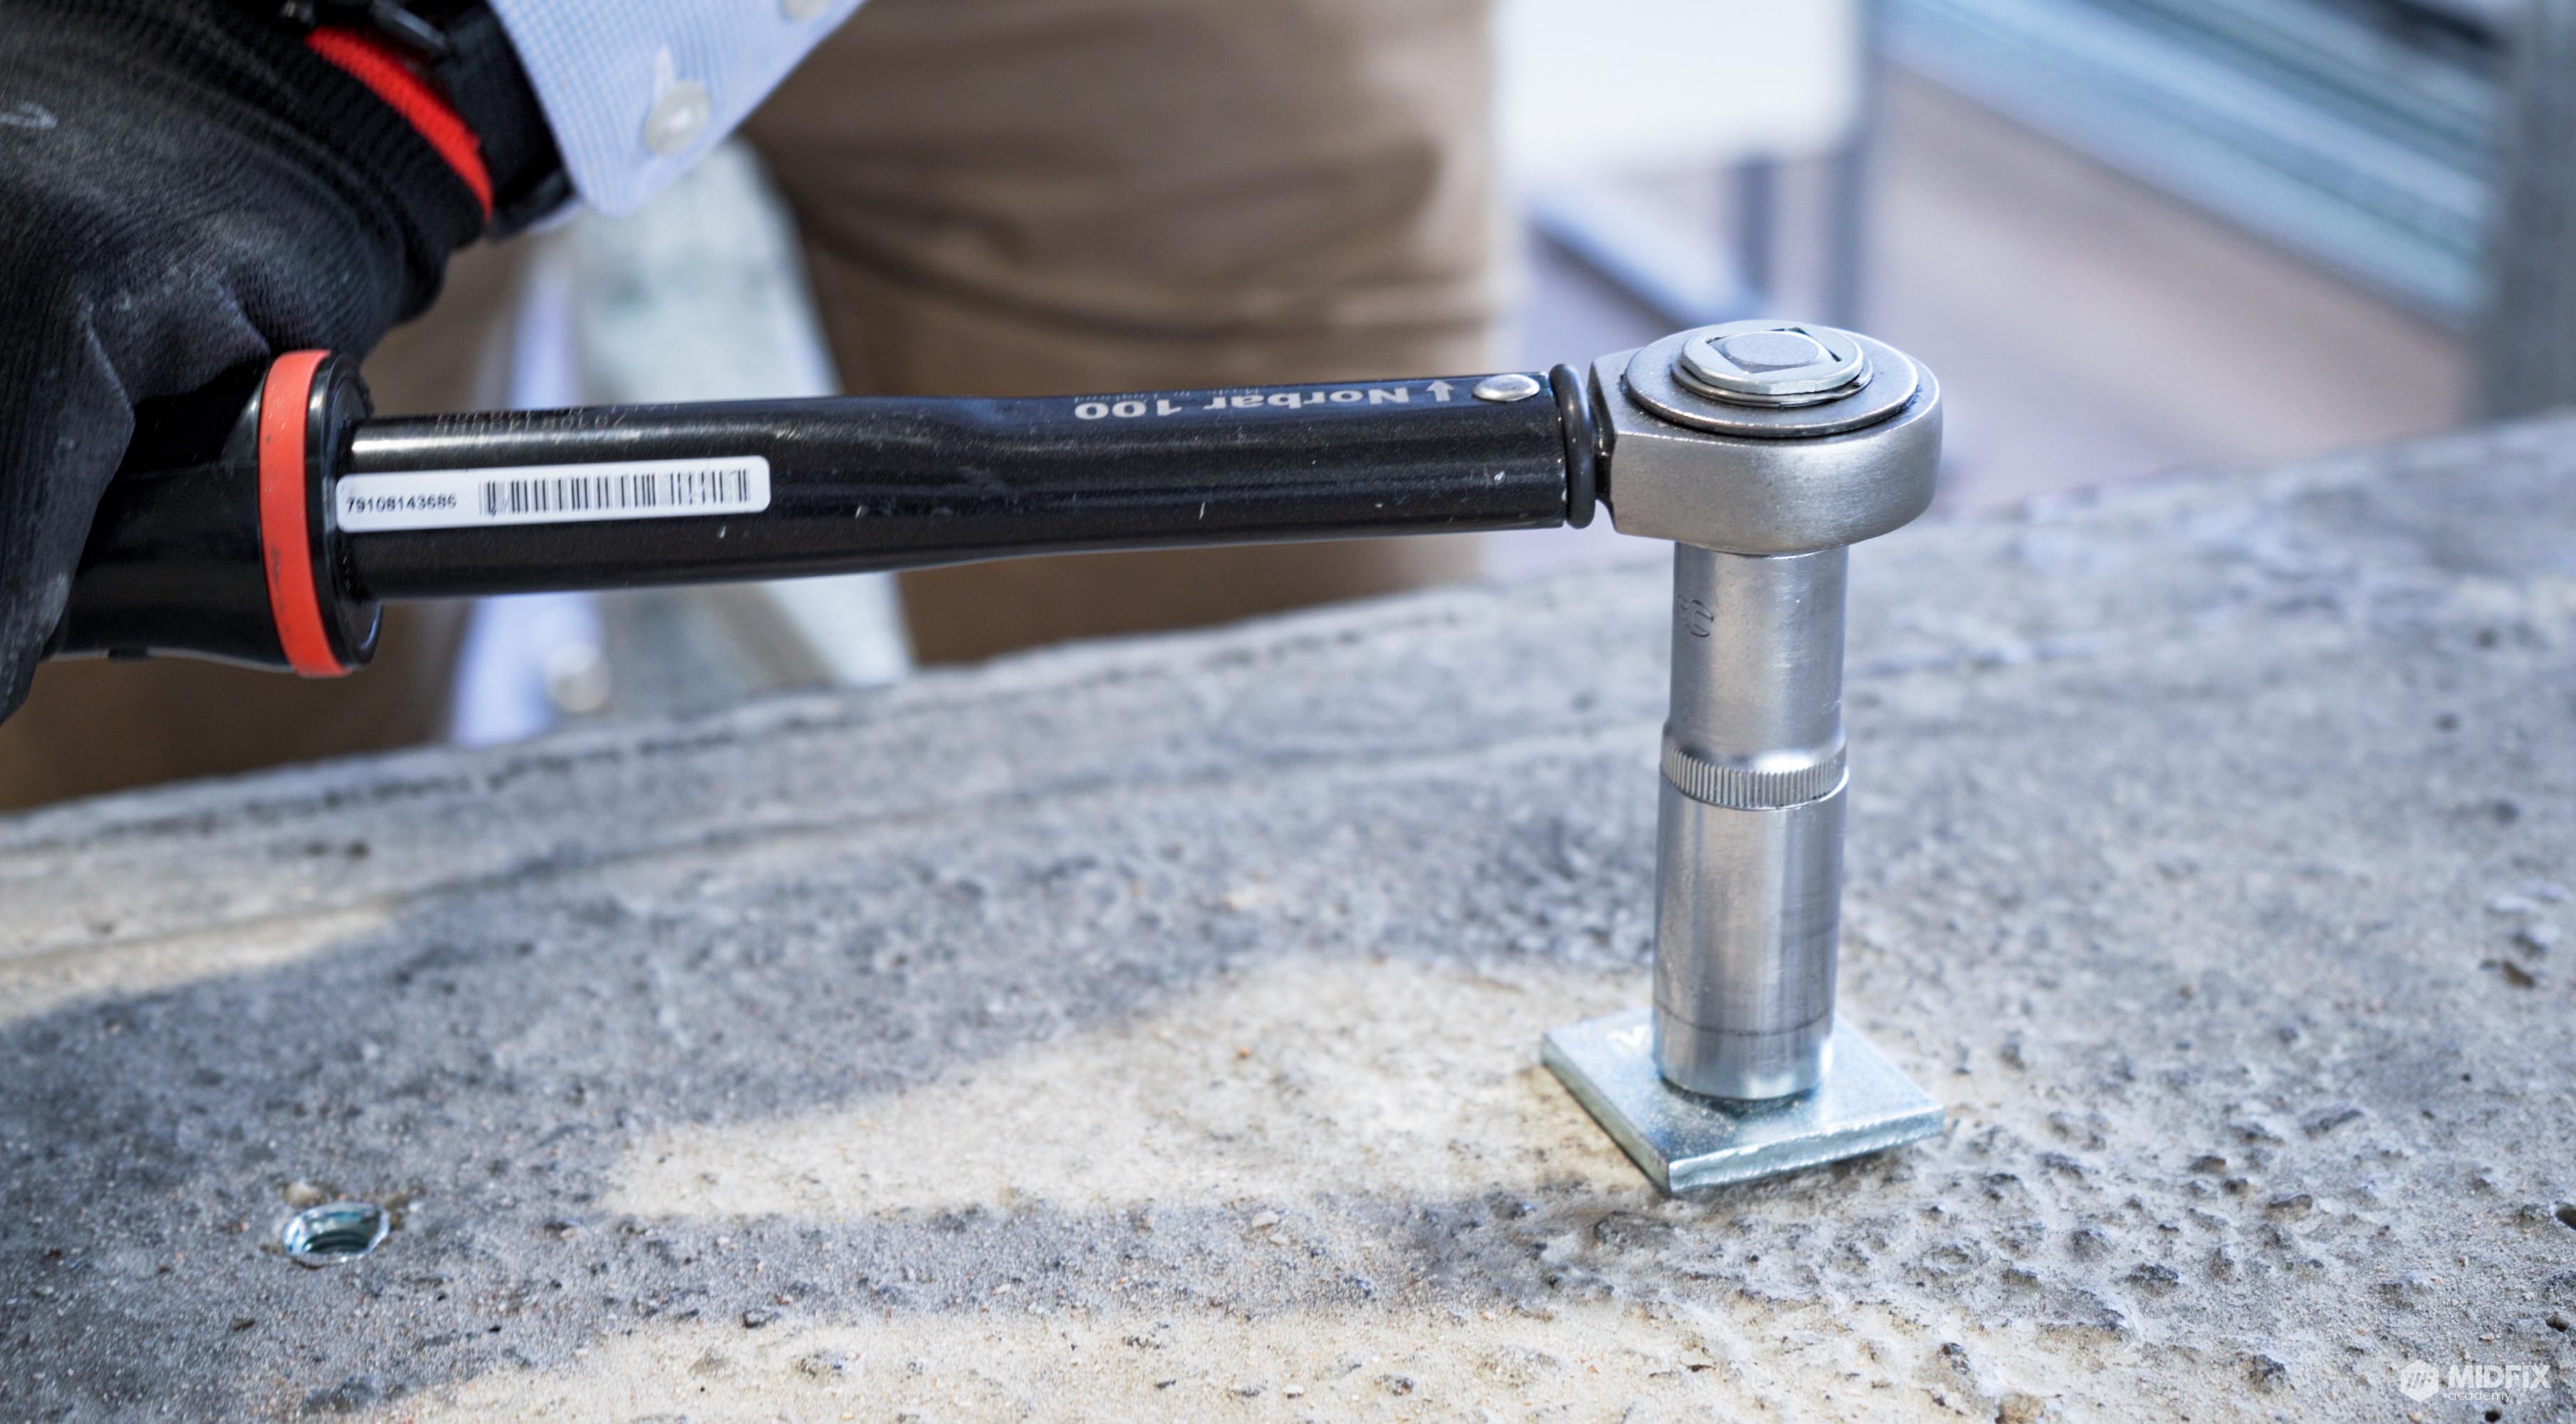
Always tighten to manufacturers recommended torque 👇🏼using a calibrated torque wrench. The torque itself does 2 jobs, 1. Sets the anchor, and 2. Creates a clamping force, and it’s this clamping force that stops the fixture from moving. And this can only be achieved by using a calibrated torque wrench.
Because these are also friction anchors, you need to consider edge distances and spacing between anchors, as failure is possible if you place the anchors on the edge of the substrate or too close to other anchors.
Throughbolts are prone to something called load relaxation, which is why the torque is so important. The clamping force can relax up to 50% with these anchors, which is a problem because it’s precisely what stops the fixture from moving. So, please, you must use a torque wrench set to the correct value when installing throughbolts. With an ETA-approved anchor, that drop in tension (load relaxation) is taken into account in this value, so it literally solves that problem for you and you can rest assured that the fixture won’t move. And be careful with overtightening – tighter does not equal better! All you achieve by overtightening is overstressing the anchor. But you need to find the right balance – the “Goldilocks” value – because the fixture might move if it’s too loose. All the more reason to use a torque wrench!
What types of throughbolts are available?
There is only one main type of throughbolt, in that they all function the same way, but they come in different finishes, maximum thicknesses, and diameters. For example, there are stainless steel options, hot-dip galvanised, zinc plated, zinc flake, etc. in M6 x 60 all the way to M20 x 170 and everything in between.
Conclusion
Phew – that took a while! I hope the article has helped you understand the difference between anchor types, how to use and install them, as well as their most suitable applications. If you need further guidance, feel free to get in touch with us, view our other articles, or even take a course on MIDFIX Academy. Good luck with your future projects!